


Table of contents
- ✦ What is Web Server?
- ⟡ In simple terms, a web server is like a waiter at a restaurant. When you (the client) make a request (like ordering food) through your browser by sending an HTTP request, the web server (the waiter) goes to the kitchen (where all the files and data are stored) and retrieves the information you asked for. It then serves the response (the dish) back to you through the internet.
- ⟡ The web server holds all the files, databases, and content that users might request. When the server receives a request, it fetches the corresponding file and sends it back as an HTTP response, allowing you to see the website or data you asked for. This cycle keeps going every time you load a page or request information.
- ✦ Different Types of Web Servers:
- ✦ Most Important once used in Industry nowadays are:
- Apache HTTP Server
- Nginx
- Tomcat
- Microsoft IIS (Internet Information Services)
- ➤ Apache Web Server
- ✦ What is HTTPD deamon?
- How to SetUp Apache WebServer in Linux?
- Step1: Install HTTPD in your Linux machine
- Step2: Then go into cd/var/www/html path and create a file named index.html
- Step3: Make sure to stop the firewall services in order to access the server in your local machine(Windows)
- Step4 :Get the IP-Address of Linux machine and type in your Windows (Local Machine) ipaddress:80
- ➤ NGINX (Engine X)
- ✦ what is nginx?
- ✦ How to SetUp nginx in Linux?
- Step1 :Write the following command
- Step 2: Write this in vi editor and save the file.
- Step 3: yum update and install nginx
- Step4: Check if any other server is running and listening at port 80 then stop that server or else you get an error like this
- Step5: Now start the nginx service
- Step6 : Now run this command
- ➤ APACHE TOMCAT SERVER
- ✦ What is Apache Tomcat Server?
- ✦ How to SetUp Apache Tomcat Server in Linux?
- Step 1: Install JDK (Java Development Kit)
- Step 2: Create a Tomcat User and Group
- Step 3: Download and Install Tomcat
- Step 4: Set Permissions for Tomcat Directory
- Step 5: Create a SystemD Service for Tomcat
- Step 6: Start the Tomcat Service
- Step 7: Enable Tomcat to Start on Boot
- Step 8: Secure Tomcat Web Applications
- Step 9: Allow Remote Access to the Web Application Manager
- Step 10: Restart Tomcat
- Step 11: Access Tomcat Web Application Manager
- Step 12 : Configure Tomcat Virtual Host Manager
- That’s All , Thank You for Reading This far and See you Next Time
✦ What is Web Server?
Web server is a program which processes the network requests of the users and serves them with files that create web pages. This exchange takes place using Hypertext Transfer Protocol (HTTP).
In Simple terms the client(User) request something to the internet through http request the internet will request it from the web servers which are basically computers that has the list of files in the data base and gives it back to internet in the form of http response and so on to the client.
⟡ In simple terms, a web server is like a waiter at a restaurant. When you (the client) make a request (like ordering food) through your browser by sending an HTTP request, the web server (the waiter) goes to the kitchen (where all the files and data are stored) and retrieves the information you asked for. It then serves the response (the dish) back to you through the internet.
⟡ The web server holds all the files, databases, and content that users might request. When the server receives a request, it fetches the corresponding file and sends it back as an HTTP response, allowing you to see the website or data you asked for. This cycle keeps going every time you load a page or request information.
✦ Different Types of Web Servers:
Apache HTTP ServerNginxTomcatMicrosoft IIS (Internet Information Services)CherokeeCaddyOpenLiteSpeedNode.JsLiteSpeed
✦ Most Important once used in Industry nowadays are:
Apache HTTP ServerNginxTomcatMicrosoft IIS (Internet Information Services)
➤ Apache Web Server

- Apache is the most popular and well-established web server. It's open-source, highly flexible, and can be configured to handle dynamic content using various modules.
✦ Used for :
WebHosting
Content Management Systems
Dynamic Websites
✦ What is HTTPD deamon?
- HTTPD deamon is a software program that runs in the background of a web server and waits for the incoming server request
How to SetUp Apache WebServer in Linux?
Step1: Install HTTPD in your Linux machine
yum install httpd
httpd -version #to check the httpd version

Step2: Then go into cd/var/www/html path and create a file named index.html
ⓘ Default port of httpd is 80
cd /var/www/html
vi index.html #create a file and write the html content
<!DOCTYPE html>
<html lang="en">
<head>
    <meta charset="UTF-8">
    <meta name="viewport" content="width=device-width, initial-scale=1.0">
    <title>Welcome to My Apache Web Server</title>
</head>
<body>

    <h1>Welcome to My Apache Web Server</h1>
    <p>Your Apache web server is up and running successfully!</p>
</body>
</html>
Step3: Make sure to stop the firewall services in order to access the server in your local machine(Windows)
systemctl stop firewalld.services #to stop the service
systemctl status firewalld.services #to check the status
Step4 :Get the IP-Address of Linux machine and type in your Windows (Local Machine) ipaddress:80
✦**There you go you successfully installed Apache WebServer

➤ NGINX (Engine X)

✦ what is nginx?
- It is a web server that access request through https and response to display website content through storing, proccessing and delivering web pages to users.
✦ How to SetUp nginx in Linux?
Step1 :Write the following command
sudo vi /etc/yum.repos.d/nginx.repo
[nginx]
name = nginx.repo
baseurl = https://nginx.org/packages/centos/9/$basearch/
gpgcheck=0
enabled=1
Step 2: Write this in vi editor and save the file.
Step 3: yum update and install nginx
1. sudo yum update
2. sudo yum install nginx
Step4: Check if any other server is running and listening at port 80 then stop that server or else you get an error like this

Step5: Now start the nginx service
systemctl start nginx # to start nginx
systemctl stop nginx # to stop nginx
systemctl status nginx #to check the status
Step6 : Now run this command
curl -I 127.0.01
When you run the command curl -I 127.0.0.1, you are asking curl to make an HTTP request to your local server (the IP address 127.0.0.1 refers to your local machine) and return only the HTTP headers.
✦ There you go you successfully installed nginx Server.

➤ APACHE TOMCAT SERVER

✦ What is Apache Tomcat Server?
Apache Tomcat is an open-Source Java-Capable HTTP server developed by the Apache Software Foundation.
It is a web Container, It allows the users to run servlet and Java Server pages that are based on the web Application. It can be used as Http Server.
✦ How to SetUp Apache Tomcat Server in Linux?
Step 1: Install JDK (Java Development Kit)
Tomcat requires Java to run, so we need to install Java (Java 8 or latest version).
Check if Java is installed by running this command:
java -versionIf Java is not installed, install it with the following commands:
 sudo yum update -y
 sudo yum install java-1.8.0-openjdk-devel -y
Verify Java Installation: After installation, check if Java is correctly installed:
java -version
Step 2: Create a Tomcat User and Group
For security, Tomcat should not run under the root user. We create a new user and group for Tomcat.
Create a group for Tomcat:
sudo groupadd tomcatCreate a user named
tomcatand set its home directory to/opt/tomcat:sudo useradd -s /bin/false -g tomcat -d /usr/share/tomcat tomcat
Step 3: Download and Install Tomcat
Navigate to the
/optdirectory:cd /usr/shareDownload Tomcat 9.0.21: Use
wgetto download the Tomcat tar.gz package:sudo wget https://archive.apache.org/dist/tomcat/tomcat-9/v9.0.21/bin/apache-tomcat-9.0.21.tar.gzExtract the tar file and rename the extracted directory to
tomcat:sudo tar -xvzf apache-tomcat-9.0.21.tar.gz sudo mv apache-tomcat-9.0.21 /usr/share/tomcat
Step 4: Set Permissions for Tomcat Directory
We need to set the correct ownership and permissions for the Tomcat directory to allow the tomcat user to manage Tomcat.
Change ownership of the
/usr/share/tomcatdirectory to thetomcatuser and group:sudo chown -R tomcat:tomcat /usr/share/tomcatGive execute permissions to the
bindirectory so that Tomcat can start:sudo chmod o+x /usr/share/tomcat/bin/
Step 5: Create a SystemD Service for Tomcat
To run Tomcat as a system service, we need to create a systemd service file.
Create the systemd service file:
sudo vi /etc/systemd/system/tomcat.serviceAdd the following configuration to the
tomcat.servicefile:```bash [Unit] Description=Tomcat 9 Server After=syslog.target network.target
[Service] Type=forking User=tomcat Group=tomcat Environment="JAVA_HOME=/usr/lib/jvm/java-1.8.0-openjdk" Environment="JAVA_OPTS=-Xms512m -Xmx512m" Environment="CATALINA_BASE=/usr/share/tomcat" Environment="CATALINA_HOME=/usr/share/tomcat" Environment="CATALINA_PID=/usr/share/tomcat/temp/tomcat.pid"
ExecStart=/opt/tomcat/bin/startup.sh ExecStop=/opt/tomcat/bin/shutdown.sh
[Install] WantedBy=multi-user.target

1. **Save and exit** the file (press `CTRL + X`, then `Y` to confirm, and `Enter` to save).
2. **Reload systemd** to apply the new service configuration:
```bash
sudo systemctl daemon-reload
Step 6: Start the Tomcat Service
Now that we have the service file, we can start Tomcat.
Start the Tomcat service:
sudo systemctl start tomcatCheck the Tomcat logs to ensure it's running smoothly:
tail -f /usr/share/tomcat/logs/catalina.outIf everything is working correctly, you can access Tomcat by visiting:
http://<your-server-ip>:8080/

✦ There you go you successfully installed TomcatServer.
Step 7: Enable Tomcat to Start on Boot
Now we’ll start Tomcat and set it to start on boot.
Start Tomcat:
sudo systemctl start tomcatEnable Tomcat to start automatically on boot:
sudo systemctl enable tomcatCheck Tomcat status:
sudo systemctl status tomcat
Step 8: Secure Tomcat Web Applications
Tomcat comes with Web Application Manager and Virtual Host Manager that are not secured by default. We’ll add authentication for these managers.
Edit the
tomcat-users.xmlfile to configure authentication:sudo vi /usr/share/tomcat/conf/tomcat-users.xmlAdd the following configuration between the
<tomcat-users>tags:<role rolename="admin-gui"/> <role rolename="manager-gui"/> <user username="admin" password="12345" FullName="Administrator" roles="admin-gui,manager-gui"/>Note: Replace "admin" and "12345" with your secure username and password.
Save and exit the file.
Step 9: Allow Remote Access to the Web Application Manager
By default, Tomcat's Web Application Manager is only accessible from localhost. To allow remote access, we’ll modify the context.xml file for the manager.
Edit the
context.xmlfile for the Web Application Manager:sudo vi /usr/share/tomcat/webapps/manager/META-INF/context.xmlLocate the following line that restricts access to localhost:
 <Valve className="org.apache.catalina.valves.RemoteAddrValve"
 allow="127\.\d+\.\d+\.\d+|::1|localhost|127.0.0.1"/>
Comment or remove this line to allow remote access:
 <!-- <Valve className="org.apache.catalina.valves.RemoteAddrValve"
 allow="127\.\d+\.\d+\.\d+|::1|localhost|127.0.0.1"/> -->
Save and exit the file.
Step 10: Restart Tomcat
To apply all changes, you need to restart Tomcat.
Restart Tomcat:
sudo systemctl restart tomcat
Step 11: Access Tomcat Web Application Manager
Now, you should be able to access the Web Application Manager remotely. Visit the following URL (replace <your-server-ip> with your actual server IP address):
http://<your-server-ip>:8080/manager/html
- Enter the username and password you set in the
tomcat-users.xmlfile.
Restart tomcat service for changes to take effect.
sudo systemctl restart tomcat

Enter the user and password as configured in Step 6.
Step 12 : Configure Tomcat Virtual Host Manager
The Tomcat virtual host manager is configured to allow access only from the localhost. To allow remote access we have to edit the
/opt/tomcat/webapps/host-manager/META-INF/context.xml
This is not recommended for production environments!!
Open the context.xml file
sudo vi /usr/share/tomcat/webapps/host-manager/META-INF/context.xml
Comment the lines as shown below:
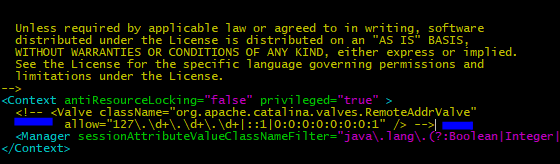
Save and exit.
Restart tomcat service for changes to take effect.
sudo systemctl restart tomcat
After Tomcat is restarted we can access the Virtual Host Manager console at the following link.
http://<tomcat-public-ip>:8080/host-manager/html
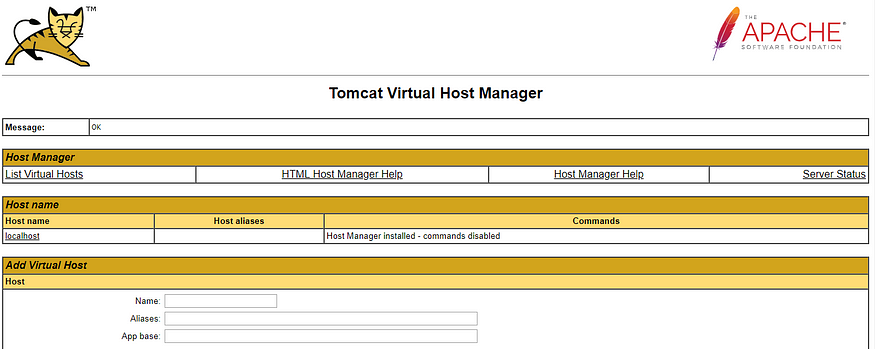
Enter the user and password as configured in Step 8.
✦ There you go you successfully installed TomcatServer.